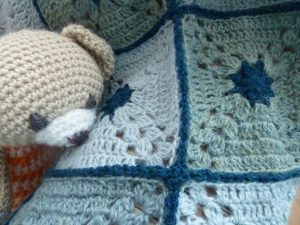
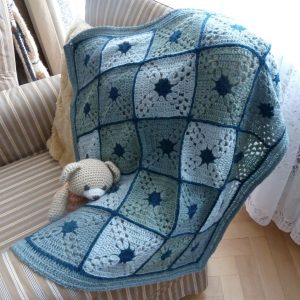
Crochet blanket from alpaca yarn consists of 25 squares. I used rests of he yarns from other projects. .
Material: 100% alpaca 50 g = cca 167 m (Drops Alpaca)
Colours:
Colour A: Bold and vibrant shade fort centres of green, blue, turquoise
Group B: light shades of blue, grey-blue, green-blue, light blue, icy blue
Hook: 3,5 mm
Square size: 18 x 18 cm
Blanket size: 100×100 cm
Skill level: skilled beginner
Stitches (US terminology)
Ch – chain
ss- slip stitch
sc – single crochet
hdc – half double crochet
dc – double crochet
tr – triple crochet
Big leaf – crochet together 3 tr
Initial big leaf – 3ch, crochet together 2 tr
Small leaf – crochet together 3 dc
Initial small leaf – 2 ch, crochet together 2 dc
COR1 – sc, ch, sc
COR1A – beginning of the row: 3ch, sc
COR2 – big leaf, 3 ch, big leaf
COR3 – small leaf, 3 ch, small leaf
COR4 – 2 dc, 2ch, 2 dc
COR4A – beginning of the row: 2ch, dc, 2ch,2dc
Square (make 25)
Start with (A), 4ch into a ring or a magic ring start
1.r (A): Initial big leaf, (3 ch , big leaf) x 7, ch, dc to the first ch3 space of current row
2.r (B): Initial big leaf, ch, 3 dc in next ch3 space, ch, (COR2, ch, 3 dc to the next ch3 space, ch) x 3, big leaf in first ch 3 space, ch, dc in first ch space of current row
3.r. (B): Initial small leaf, ch, 2 dc in ch space, 3 dc in dc, 2 dc in next ch space, ch, (COR3, ch, 2 dc in ch space, 3 dc in dc, 2 dc in next ch space, ch)x3, small leaf in corner space, ch, dc in the first ch space of current row (2 leaves and 7 dc on side)
4.r. (B): Initial small leaf, ch, 2 dc in ch space, 7 dc in dc, 2 dc in next ch space, ch, (COR3, ch, 2 dc in ch space, 7 dc in dc, 2 dc in next ch space, ch)x3, small leaf in corner space, ch, dc in the first ch space of current row (2 leaves and 7 dc on side)
5.r. (B): Initial small leaf, ch, 2 dc in ch space, 7 dc in dc, 2 dc in next ch space, ch, (COR3, ch, 2 dc in ch space, 11 dc in dc, 2 dc in next ch space, ch)x3, small leaf in corner space, 3 ch, finish with invisible join to the initial leaf (2 leaves and 11 dc on side). Sew in the yarn ends.
You will reach professional look by blocking the squares. In my case I did not block, and the result is excellent.
Joining the squares
Use yarn (A).
Place the squares flatly as you wish to have them in the blanket.
Sew or crochet them together in one direction and then in other direction.
I crocheted them together with ss to the BL. When I held 2 squares back-to back BLs are: 2nd loop on the square near to you, 1st loop of the farer square.
Ss to both corner chains, (15 ss to dc, 2 ss to corner chains, ch2, 2 ss to corner chains) repeat to join all squares in row, finish the row with ss to both corner chains. Do not twist the squares. Put a marker to first square.
Edge
Please check the condition of your edge, if necessary, unwind and adjust the number of stitches according to the needs of your project. Attach new color of yarn to the corner with a ss, tighten the ss before starting the row.
1.r: (A) A row of sc. All sc except of corners of the blanket are crocheted to back loops! Start at one of the corners. COR1 to every corner. Sc to every sc, sc to both chains of the square edge (there are 4 sc at the squares connection)
2.-3.r: (B) Rows of dc. COR4A to the first corner, COR 4 to other 3 corners, dc to every sc
Rows 4 and 5 will firm your edge, so the blanket is nice after several washings.
4. r: (B): /COR1, (ch, skip 1, sc) repeat to the end of side, ch/ x 4, finish with a ss to the first corner space.
5.r. (B): /COR1, (ch, skip 1, sc to the skipped sc of row 3) repeat to the end of side, ch/ x 4, finish with invisible join.
Sew in the yarn ends, blanket is finished.


